Copyright © 2001-2005 Thomas M. Eastep
Permission is granted to copy, distribute and/or modify this document under the terms of the GNU Free Documentation License, Version 1.2 or any later version published by the Free Software Foundation; with no Invariant Sections, with no Front-Cover, and with no Back-Cover Texts. A copy of the license is included in the section entitled “GNU Free Documentation License”.
2020/04/17
Table of Contents
Caution
This article applies to Shorewall 3.0 and later. If you are running a version of Shorewall earlier than Shorewall 3.0.0 then please see the documentation for that release.
This guide is intended for users who are setting up Shorewall in an environment where a set of public IP addresses must be managed or who want to know more about Shorewall than is contained in the single-address guides. Because the range of possible applications is so broad, the Guide will give you general guidelines and will point you to other resources as necessary.
Caution
Shorewall requires that the iproute/iproute2 package be installed (on RedHat, the package is called iproute). You can tell if this package is installed by the presence of an ip program on your firewall system. As root, you can use the “which” command to check for this program:
[root@gateway root]# which ip
/sbin/ip
[root@gateway root]#
I recommend that you first read through the guide to familiarize
yourself with what's involved then go back through it again making your
configuration changes. Points at which configuration changes are
recommended are flagged with  .
.
Caution
If you edit your configuration files on a Windows system, you must save them as Unix files if your editor supports that option or you must run them through dos2unix before trying to use them with Shorewall. Similarly, if you copy a configuration file from your Windows hard drive to a floppy disk, you must run dos2unix against the copy before using it with Shorewall.
The configuration files for Shorewall are contained in the directory
/etc/shorewall -- for most setups,
you will only need to deal with a few of these as described in this guide.
Skeleton files are created during the Shorewall Installation Process.
Warning
Note to Debian Users
If you install using the .deb, you will find that your /etc/shorewall directory is almost empty.
This is intentional. The released configuration file skeletons may be
found on your system in the directory /usr/share/doc/shorewall/default-config.
Simply copy the files you need from that directory to /etc/shorewall and modify the
copies.
As each file is introduced, I suggest that you look through the actual file on your system -- each file contains detailed configuration instructions.
Shorewall views the network where it is running as being composed of
a set of zones. A zone is one or more hosts, which can be defined as
individual hosts or networks in /etc/shorewall/hosts, or as an entire
interface in /etc/shorewall/interfaces. In this guide, we
will use the following zones:
- fw
The firewall system itself.
- net
The public Internet.
- loc
A private local network using private IP addresses.
- dmz
A Demilitarized Zone holding publicly-accessible servers.
Zones are defined in the file /etc/shorewall/zones
Important
The /etc/shorewall/zones file included in the
release is empty. You can create the standard set of zones described
above by copying and pasting the following into the file:
#ZONE   TYPE             OPTIONS
fw      firewall
net     ipv4
loc     ipv4
dmz     ipv4
Note that Shorewall recognizes the firewall system as its own zone - The above example follows the usual convention of naming the Firewall zone fw. The name specified for the firewall zone (fw in the above example) is stored in the shell variable $FW when the /etc/shorewall/zones file is processed. With the exception of the name assigned to the firewall zone, Shorewall attaches absolutely no meaning to zone names. Zones are entirely what YOU make of them. That means that you should not expect Shorewall to do something special “because this is the Internet zone” or “because that is the DMZ”.
Edit the /etc/shorewall/zones file and make any changes necessary.
Rules about what traffic to allow and what traffic to deny are expressed in terms of zones.
You express your default policy for connections from one zone to another zone in the
/etc/shorewall/policyfile.You define exceptions to those default policies in the
/etc/shorewall/rules.
Shorewall is built on top of the Netfilter kernel facility. Netfilter implements a connection tracking function that allows what is often referred to as stateful inspection of packets. This stateful property allows firewall rules to be defined in terms of connections rather than in terms of packets. With Shorewall, you:
Identify the source (client) zone.
Identify destination (server) zone.
If the POLICY from the client's zone to the server's zone is what you want for this client/server pair, you need do nothing further.
If the POLICY is not what you want, then you must add a rule. That rule is expressed in terms of the client's zone and the server's zone.
Just because connections of a particular type are allowed from zone A to the firewall and are also allowed from the firewall to zone B DOES NOT mean that these connections are allowed from zone A to zone B (in other words, policies and rules involving the firewall zone are not transitive). It rather means that you can have a proxy running on the firewall that accepts a connection from zone A and then establishes its own separate connection from the firewall to zone B.
For each connection request entering the firewall, the request is
first checked against the /etc/shorewall/rules file.
If no rule in that file matches the connection request then the first
policy in /etc/shorewall/policy that matches the
request is applied after the request is passed to the appropriate default action (if any).
Prior to Shorewall 2.2.0, the default
/etc/shorewall/policy file had the following
policies:
#SOURCE          DEST                POLICY     LOGLEVEL     LIMIT
loc              net                 ACCEPT
net              all                 DROP       info
all              all                 REJECT     info
Important
The currently released policy file is empty. You can copy and paste the above entries to create a starting point from which to customize your policies.
The above policies will:
allow all connection requests from your local network to the Internet
drop (ignore) all connection requests from the Internet to your firewall or local network and log a message at the info level (here is a description of log levels).
reject all other connection requests and log a message at the info level. When a request is rejected, the firewall will return an RST (if the protocol is TCP) or an ICMP port-unreachable packet for other protocols.
At this point, edit your /etc/shorewall/policy
and make any changes that you wish.
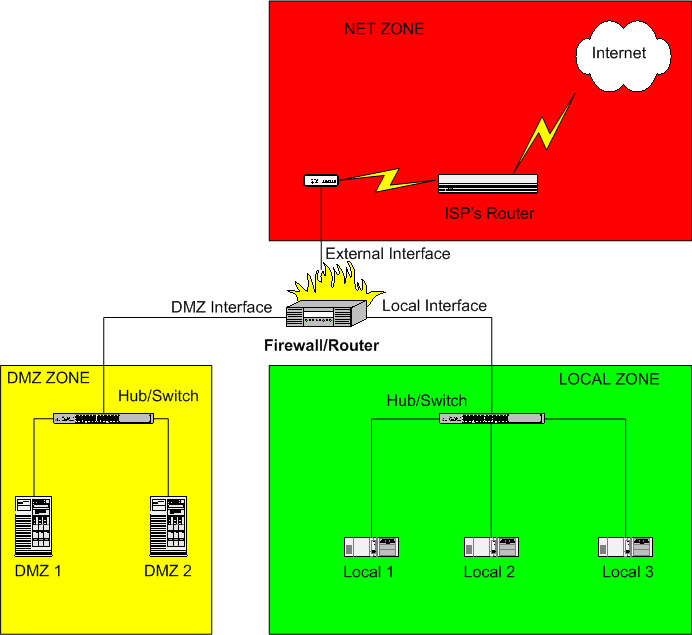
For the remainder of this guide, we'll refer to the following diagram. While it may not look like your own network, it can be used to illustrate the important aspects of Shorewall configuration.
In this diagram:
The DMZ Zone consists of systems DMZ 1 and DMZ 2. A DMZ is used to isolate your Internet-accessible servers from your local systems so that if one of those servers is compromised, you still have the firewall between the compromised system and your local systems.
The Local Zone consists of systems Local 1, Local 2 and Local 3.
All systems from the ISP outward comprise the Internet Zone.
The simplest way to define zones is to associate the zone name
(previously defined in /etc/shorewall/zones) with a network interface.
This is done in the /etc/shorewall/interfaces
file. The firewall illustrated above has three network interfaces. Where
Internet connectivity is through a cable or DSL “Modem”, the
External Interface will be the Ethernet adapter that
is connected to that “Modem” (e.g., eth0) unless you connect via Point-to-Point
Protocol over Ethernet (PPPoE) or Point-to-Point Tunneling Protocol (PPTP)
in which case the External Interface will be a ppp interface (e.g.,
ppp0). If you connect via a
regular modem, your External Interface will also be ppp0. If you connect using ISDN, you
external interface will be ippp0.
If your external interface is ppp0 or ippp0 then you will want to set CLAMPMSS=yes
in /etc/shorewall/shorewall.conf.
Your Local Interface will be an Ethernet
adapter (eth0,
eth1 or eth2)
and will be connected to a hub or switch. Your local computers will be
connected to the same switch (note: If you have only a single local
system, you can connect the firewall directly to the computer using a
cross-over cable).
Your DMZ Interface will also be an Ethernet
adapter (eth0, eth1 or eth2) and will be connected to a hub or
switch. Your DMZ computers will be connected to the same switch (note: If
you have only a single DMZ system, you can connect the firewall directly
to the computer using a cross-over cable).
Caution
Do not connect the internal and external interface to the same hub
or switch except for testing. You can test using this kind of
configuration if you specify the arp_filter option or the arp_ignore option in
/etc/shorewall/interfaces for all interfaces
connected to the common hub/switch. Using such a setup with a production
firewall is strongly recommended against.
For the remainder of this Guide, we will assume that:
The External Interface is
eth0.The Local Interface
eth1.The DMZ Interface
eth2.
The Shorewall default configuration does not define the contents of any zone. To define the above configuration using the /etc/shorewall/interfaces file, that file would might contain:
?FORMAT 2
#ZONE    INTERFACE      OPTIONS
net      eth0
loc      eth1
dmz      eth2
Note that the $FW zone has no entry in the /etc/shorewall/interfaces file.
Edit the /etc/shorewall/interfaces file and
define the network interfaces on your firewall and associate each
interface with a zone. If you have a zone that is interfaced through more
than one interface, simply include one entry for each interface and repeat
the zone name as many times as necessary.
Example 1. Multiple Interfaces to a Zone
?FORMAT 2
#ZONE    INTERFACE      BROADCAST     OPTIONS
net      eth0
loc      eth1
loc      eth2
You may define more complicated zones using the /etc/shorewall/hosts
file but in most cases, that isn't necessary. See Shorewall_and_Aliased_Interfaces.html
and Multiple_Zones.html for
examples.
Normally, your ISP will assign you a set of Public IP addresses. You will configure your firewall's external interface to use one of those addresses permanently and you will then have to decide how you are going to use the rest of your addresses. Before we tackle that question though, some background is in order.
If you are thoroughly familiar with IP addressing and routing, you may go to the next section.
The following discussion barely scratches the surface of addressing and routing. If you are interested in learning more about this subject, I highly recommend “IP Fundamentals: What Everyone Needs to Know about Addressing & Routing”, Thomas A. Maufer, Prentice-Hall, 1999, ISBN 0-13-975483-0.
IP version 4 (IPv4) addresses are 32-bit numbers. The notation w.x.y.z refers to an address where the high-order byte has value “w”, the next byte has value “x”, etc. If we take the address 192.0.2.14 and express it in hexadecimal, we get:
C0.00.02.0E
or looking at it as a 32-bit integer
C000020E
You will still hear the terms “Class A network”, “Class B network” and “Class C network”. In the early days of IP, networks only came in three sizes (there were also Class D networks but they were used differently):
| Class A - netmask 255.0.0.0, size = 2 ** 24 |
| Class B - netmask 255.255.0.0, size = 2 ** 16 |
| Class C - netmask 255.255.255.0, size = 256 |
The class of a network was uniquely determined by the value of the high order byte of its address so you could look at an IP address and immediately determine the associated netmask. The netmask is a number that when logically ANDed with an address isolates the network number; the remainder of the address is the host number. For example, in the Class C address 192.0.2.14, the network number is hex C00002 and the host number is hex 0E.
As the Internet grew, it became clear that such a gross partitioning of the 32-bit address space was going to be very limiting (early on, large corporations and universities were assigned their own class A network!). After some false starts, the current technique of subnetting these networks into smaller subnetworks evolved; that technique is referred to as Classless InterDomain Routing (CIDR). Today, any system that you are likely to work with will understand CIDR and Class-based networking is largely a thing of the past.
A subnetwork (often referred to as a subnet) is a contiguous set of IP addresses such that:
The number of addresses in the set is a power of 2; and
The first address in the set is a multiple of the set size.
The first address in the subnet is reserved and is referred to as the subnet address.
The last address in the subnet is reserved as the subnet's broadcast address.
As you can see by this definition, in each subnet of size n there are (n - 2) usable addresses (addresses that can be assigned to hosts). The first and last address in the subnet are used for the subnet address and subnet broadcast address respectively. Consequently, small subnetworks are more wasteful of IP addresses than are large ones.
Since n is a power of two, we can easily calculate the Base-2 Logarithm (log2) of n. For the more common subnet sizes, the size and its base-2 logarithm are given in the following table:
Table 1. Base-2 Logarithms
| n | log2 n | (32 - log2 n) |
| 8 | 3 | 29 |
| 16 | 4 | 28 |
| 32 | 5 | 27 |
| 64 | 6 | 26 |
| 128 | 7 | 25 |
| 256 | 8 | 24 |
| 512 | 9 | 23 |
| 1024 | 10 | 22 |
| 2048 | 11 | 21 |
| 4096 | 12 | 20 |
| 8192 | 13 | 19 |
| 16384 | 14 | 18 |
| 32768 | 15 | 17 |
| 65536 | 16 | 16 |
You will notice that the above table also contains a column for (32 - log2 n). That number is the Variable Length Subnet Mask (VLSM) for a network of size n. From the above table, we can derive the following one which is a little easier to use.
Table 2. VLSM
| Subnet Size | VLSM | Subnet Mask |
| 8 | /29 | 255.255.255.248 |
| 16 | /28 | 255.255.255.240 |
| 32 | /27 | 255.255.255.224 |
| 64 | /26 | 255.255.255.192 |
| 128 | /25 | 255.255.255.128 |
| 256 | /24 | 255.255.255.0 |
| 512 | /23 | 255.255.254.0 |
| 1024 | /22 | 255.255.252.0 |
| 2048 | /21 | 255.255.248.0 |
| 4096 | /20 | 255.255.240.0 |
| 8192 | /19 | 255.255.224.0 |
| 16384 | /18 | 255.255.192.0 |
| 32768 | /17 | 255.255.128.0 |
| 65536 | /16 | 255.255.0.0 |
| 2 ** 24 | /8 | 255.0.0.0 |
Notice that the VLSM is written with a slash (“/”) -- you will often hear a subnet of size 64 referred to as a “slash 26” subnet and one of size 8 referred to as a “slash 29”.
The subnet's mask (also referred to as its netmask) is simply a 32-bit number with the first “VLSM” bits set to one and the remaining bits set to zero. For example, for a subnet of size 64, the subnet mask has 26 leading one bits:
11111111111111111111111111000000 = FFFFFFC0 = FF.FF.FF.C0 = 255.255.255.192
The subnet mask has the property that if you logically AND the subnet mask with an address in the subnet, the result is the subnet address. Just as important, if you logically AND the subnet mask with an address outside the subnet, the result is NOT the subnet address. As we will see below, this property of subnet masks is very useful in routing.
For a subnetwork whose address is a.b.c.d and whose Variable Length Subnet Mask is /v, we denote the subnetwork as “a.b.c.d/v” using CIDR Notation. Example:
Table 3. Subnet
| Subnet: | 10.10.10.0 - 10.10.10.127 |
| Subnet Size: | 128 |
| Subnet Address: | 10.10.10.0 |
| Broadcast Address: | 10.10.10.127 |
| CIDR Notation: | 10.10.10.0/25 |
There are two degenerate subnets that need mentioning; namely, the subnet with one member and the subnet with 2 ** 32 members.
Table 4. /32 and /0
| Subnet Size | VLSM Length | Subnet Mask | CIDR Notation |
| 1 | 32 | 255.255.255.255 | a.b.c.d/32 |
| 32 | 0 | 0.0.0.0 | 0.0.0.0/0 |
So any address a.b.c.d may also be written a.b.c.d/32 and the set of all possible IP addresses is written 0.0.0.0/0.
A Shorewall user has contributed a useful graphical summary of the above information.
Later in this guide, you will see the notation a.b.c.d/v used to describe the ip configuration of a network interface (the “ip” utility also uses this syntax). This simply means that the interface is configured with ip address a.b.c.d and with the netmask that corresponds to VLSM /v.
Example 2. 192.0.2.65/29
The interface is configured with IP address 192.0.2.65 and netmask 255.255.255.248.
/sbin/shorewall supports an ipcalc command that automatically calculates information about a [sub]network.
Example 3. Using the ipcalc command
shorewall ipcalc 10.10.10.0/25
   CIDR=10.10.10.0/25
   NETMASK=255.255.255.128
   NETWORK=10.10.10.0
   BROADCAST=10.10.10.127
Example 4. Using the ipcalc command
shorewall ipcalc 10.10.10.0 255.255.255.128
   CIDR=10.10.10.0/25
   NETMASK=255.255.255.128
   NETWORK=10.10.10.0
   BROADCAST=10.10.10.127
One of the purposes of subnetting is that it forms the basis for routing. Here's the routing table on my firewall (compressed for PDF):
[root@gateway root]# netstat -nr
Kernel IP routing table
Destination     Gateway         Genmask         Flgs MSS Win irtt Iface
192.168.9.1     0.0.0.0         255.255.255.255 UH   40  0      0 texas
206.124.146.177 0.0.0.0         255.255.255.255 UH   40  0      0 eth1
206.124.146.180 0.0.0.0         255.255.255.255 UH   40  0      0 eth3
192.168.3.0     0.0.0.0         255.255.255.0   U    40  0      0 eth3
192.168.2.0     0.0.0.0         255.255.255.0   U    40  0      0 eth1
192.168.1.0     0.0.0.0         255.255.255.0   U    40  0      0 eth2
206.124.146.0   0.0.0.0         255.255.255.0   U    40  0      0 eth0
192.168.9.0     192.0.2.223     255.255.255.0   UG   40  0      0 texas
127.0.0.0       0.0.0.0         255.0.0.0       U    40  0      0 lo
0.0.0.0         206.124.146.254 0.0.0.0         UG   40  0      0 eth0
[root@gateway root]#
The device texas is a GRE tunnel to a peer site in the Dallas, Texas area.
The first three routes are host routes since they indicate how to get to a single host. In the “netstat” output this can be seen by the “Genmask” (Subnet Mask) of 255.255.255.255 and the “H” in the Flags column. The remainder are “net” routes since they tell the kernel how to route packets to a subnetwork. The last route is the default route and the gateway mentioned in that route is called the default gateway.
When the kernel is trying to send a packet to IP address A, it starts at the top of the routing table and:
A is logically ANDed with the “Genmask” value in the table entry.
The result is compared with the “Destination” value in the table entry.
If the result and the “Destination” value are the same, then:
If the “Gateway” column is non-zero, the packet is sent to the gateway over the interface named in the “Iface” column.
Otherwise, the packet is sent directly to A over the interface named in the “iface” column.
Otherwise, the above steps are repeated on the next entry in the table.
Since the default route matches any IP address (A LAND 0.0.0.0 = 0.0.0.0), packets that don't match any of the other routing table entries are sent to the default gateway which is usually a router at your ISP. Lets take an example. Suppose that we want to route a packet to 192.168.1.5. That address clearly doesn't match any of the host routes in the table but if we logically and that address with 255.255.255.0, the result is 192.168.1.0 which matches this routing table entry:
192.168.1.0 0.0.0.0 255.255.255.0 U 40 0 0 eth2
So to route a packet to 192.168.1.5, the packet is sent directly over eth2.
One more thing needs to be emphasized -- all outgoing packet are sent using the routing table and reply packets are not a special case. There seems to be a common misconception whereby people think that request packets are like salmon and contain a genetic code that is magically transferred to reply packets so that the replies follow the reverse route taken by the request. That isn't the case; the replies may take a totally different route back to the client than was taken by the requests -- they are totally independent.
When sending packets over Ethernet, IP addresses aren't used. Rather Ethernet addressing is based on Media Access Control (MAC) addresses. Each Ethernet device has its own unique MAC address which is burned into a PROM on the device during manufacture. You can obtain the MAC of an Ethernet device using the “ip” utility:
[root@gateway root]# ip addr show eth0
2: eth0: <BROADCAST,MULTICAST,UP> mtu 1500 qdisc htb qlen 100
link/ether 02:00:08:e3:fa:55 brd ff:ff:ff:ff:ff:ff
inet 206.124.146.176/24 brd 206.124.146.255 scope global eth0
inet 206.124.146.178/24 brd 206.124.146.255 scope global secondary eth0
inet 206.124.146.179/24 brd 206.124.146.255 scope global secondary eth0
[root@gateway root]#
As you can see from the above output, the MAC is 6 bytes (48 bits) wide. A card's MAC is usually also printed on a label attached to the card itself. Because IP uses IP addresses and Ethernet uses MAC addresses, a mechanism is required to translate an IP address into a MAC address; that is the purpose of the Address Resolution Protocol (ARP). Here is ARP in action:
[root@gateway root]# tcpdump -nei eth2 arp
tcpdump: listening on eth2
09:56:49.766757 2:0:8:e3:4c:48 0:6:25:aa:8a:f0 arp 42:
                arp who-has 192.168.1.19 tell 192.168.1.254
09:56:49.769372 0:6:25:aa:8a:f0 2:0:8:e3:4c:48 arp 60:
                arp reply 192.168.1.19 is-at 0:6:25:aa:8a:f0

2 packets received by filter
0 packets dropped by kernel
[root@gateway root]#
In this exchange, 192.168.1.254 (MAC 2:0:8:e3:4c:48) wants to know the MAC of the device with IP address 192.168.1.19. The system having that IP address is responding that the MAC address of the device with IP address 192.168.1.19 is 0:6:25:aa:8a:f0.
In order to avoid having to exchange ARP information each time that an IP packet is to be sent, systems maintain an ARP cache of IP<->MAC correspondences. You can see the ARP cache on your system (including your Windows system) using the “arp” command:
[root@gateway root]# arp -na
? (206.124.146.177) at 00:A0:C9:15:39:78 [ether] on eth1
? (192.168.1.3) at 00:A0:CC:63:66:89 [ether] on eth2
? (192.168.1.5) at 00:A0:CC:DB:31:C4 [ether] on eth2
? (206.124.146.254) at 00:03:6C:8A:18:38 [ether] on eth0
? (192.168.1.19) at 00:06:25:AA:8A:F0 [ether] on eth2
The leading question marks are a result of my having specified the “n” option (Windows “arp” doesn't allow that option) which causes the “arp” program to forgo IP->DNS name translation. Had I not given that option, the question marks would have been replaced with the FQDN corresponding to each IP address. Notice that the last entry in the table records the information we saw using tcpdump above.
IP addresses are allocated by the Internet Assigned Number Authority (IANA) who delegates allocations on a geographic basis to Regional Internet Registries (RIRs). For example, allocation for the Americas and for sub-Sahara Africa is delegated to the American Registry for Internet Numbers (ARIN). These RIRs may in turn delegate to national registries. Most of us don't deal with these registrars but rather get our IP addresses from our ISP. It's a fact of life that most of us can't afford as many Public IP addresses as we have devices to assign them to so we end up making use of Private IP addresses. RFC 1918 reserves several IP address ranges for this purpose:
10.0.0.0    - 10.255.255.255
172.16.0.0  - 172.31.255.255
192.168.0.0 - 192.168.255.255
The addresses reserved by RFC 1918 are sometimes referred to as non-routable because the Internet backbone routers don't forward packets which have an RFC-1918 destination address. This is understandable given that anyone can select any of these addresses for their private use but the term non-routable is somewhat unfortunate because it leads people to the erroneous conclusion that traffic destined for one of these addresses can't be sent through a router. This is definitely not true; private routers (including your Shorewall-based firewall) can forward RFC 1918 addressed traffic just fine.
When selecting addresses from these ranges, there's a couple of things to keep in mind:
As the IPv4 address space becomes depleted, more and more organizations (including ISPs) are beginning to use RFC 1918 addresses in their infrastructure.
You don't want to use addresses that are being used by your ISP or by another organization with whom you want to establish a VPN relationship.
So it's a good idea to check with your ISP to see if they are using (or are planning to use) private addresses before you decide the addresses that you are going to use.
Warning
In this document, external “real” IP addresses are of the form 192.0.2.x. 192.0.2.0/24 is reserved by RFC 3330 for use as public IP addresses in printed examples and test networks. These "real" addresses are not to be confused with addresses in 192.168.0.0/16; as described above, those addresses are reserved by RFC 1918 for private use.
The choice of how to set up your network depends primarily on how many Public IP addresses you have vs. how many addressable entities you have in your network. Regardless of how many addresses you have, your ISP will handle that set of addresses in one of two ways:
Routed - Traffic to any of your addresses will be routed through a single gateway address. This will generally only be done if your ISP has assigned you a complete subnet (/29 or larger). In this case, you will assign the gateway address as the IP address of your firewall/router's external interface.
Non-routed - Your ISP will send traffic to each of your addresses directly.
In the subsections that follow, we'll look at each of these separately.
Before we begin, there is one thing for you to check:
If you are using the Debian package, please check your shorewall.conf file to ensure that the following are set correctly; if they are not, change them appropriately:
IP_FORWARDING=On
Let's assume that your ISP has assigned you the subnet 192.0.2.64/28 routed through 192.0.2.65. That means that you have IP addresses 192.0.2.64 - 192.0.2.79 and that your firewall's external IP address is 192.0.2.65. Your ISP has also told you that you should use a netmask of 255.255.255.0 (so your /28 is part of a larger /24). With this many IP addresses, you are able to subnet your /28 into two /29's and set up your network as shown in the following diagram.
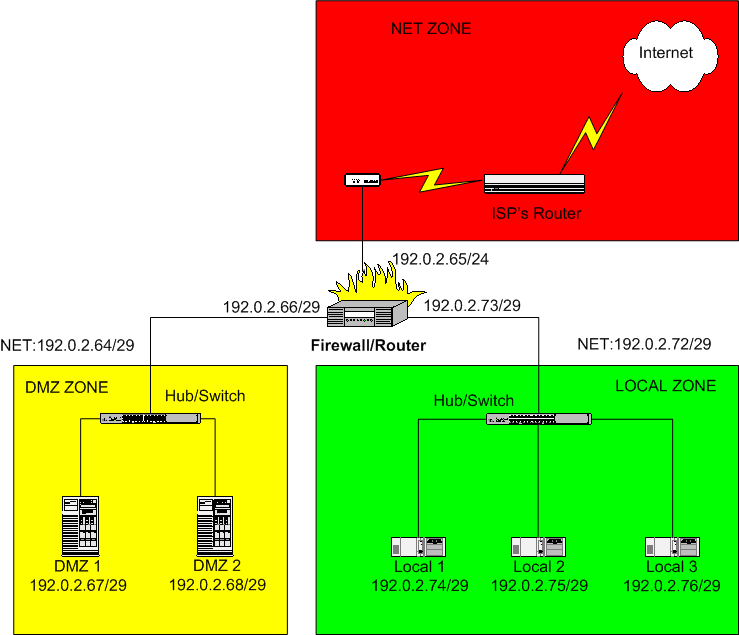
Here, the DMZ comprises the subnet 192.0.2.64/29 and the Local network is 192.0.2.72/29. The default gateway for hosts in the DMZ would be configured to 192.0.2.66 and the default gateway for hosts in the local network would be 192.0.2.73.
Notice that this arrangement is rather wasteful of public IP addresses since it is using 192.0.2.64 and 192.0.2.72 for subnet addresses, 192.0.2.71 and 192.0.2.79 for subnet broadcast addresses and 192.0.2.66 and 168.0.2.73 for internal addresses on the firewall/router. Nevertheless, it shows how subnetting can work and if we were dealing with a /24 rather than a /28 network, the use of 6 IP addresses out of 256 would be justified because of the simplicity of the setup.
The astute reader may have noticed that the Firewall/Router's external interface is actually part of the DMZ subnet (192.0.2.64/29). What if DMZ 1 (192.0.2.67) tries to communicate with 192.0.2.65? The routing table on DMZ 1 will look like this:
Kernel IP routing table
Destination    Gateway     Genmask         Flags MSS Window irtt Iface
192.0.2.64     0.0.0.0     255.255.255.248 U     40  0         0 eth0
0.0.0.0        192.0.2.66  0.0.0.0         UG    40  0         0 eth0
This means that DMZ 1 will send an ARP “who-has 192.0.2.65” request and no device on the DMZ Ethernet segment has that IP address. Oddly enough, the firewall will respond to the request with the MAC address of its DMZ Interface!! DMZ 1 can then send Ethernet frames addressed to that MAC address and the frames will be received (correctly) by the firewall/router.
It is this rather unexpected ARP behavior on the part of the Linux Kernel that prompts the warning earlier in this guide regarding the connecting of multiple firewall/router interfaces to the same hub or switch. When an ARP request for one of the firewall/router's IP addresses is sent by another system connected to the hub/switch, all of the firewall's interfaces that connect to the hub/switch can respond! It is then a race as to which “here-is” response reaches the sender first.
If you have the above situation but it is non-routed, you can configure your network exactly as described above with one additional twist; simply specify the “proxyarp” option on all three firewall interfaces in the /etc/shorewall/interfaces file.
Most of us don't have the luxury of having enough public IP addresses to set up our networks as shown in the preceding example (even if the setup is routed).
For the remainder of this section, assume that your ISP has assigned you IP addresses 192.0.2.176-180 and has told you to use netmask 255.255.255.0 and default gateway 192.0.2.254.
Clearly, that set of addresses doesn't comprise a subnetwork and there aren't enough addresses for all of the network interfaces. There are four different techniques that can be used to work around this problem.
Source Network Address Translation (SNAT).
Destination Network Address Translation (DNAT) also known as Port Forwarding.
Proxy ARP.
Network Address Translation (NAT) also referred to as One-to-one NAT.
Often a combination of these techniques is used. Each of these will be discussed in the sections that follow.
With SNAT, an internal LAN segment is configured using RFC 1918 addresses. When a host A on this internal segment initiates a connection to host B on the Internet, the firewall/router rewrites the IP header in the request to use one of your public IP addresses as the source address. When B responds and the response is received by the firewall, the firewall changes the destination address back to the RFC 1918 address of A and forwards the response back to A.
Let's suppose that you decide to use SNAT on your local zone and use public address 192.0.2.176 as both your firewall's external IP address and the source IP address of Internet requests sent from that zone.
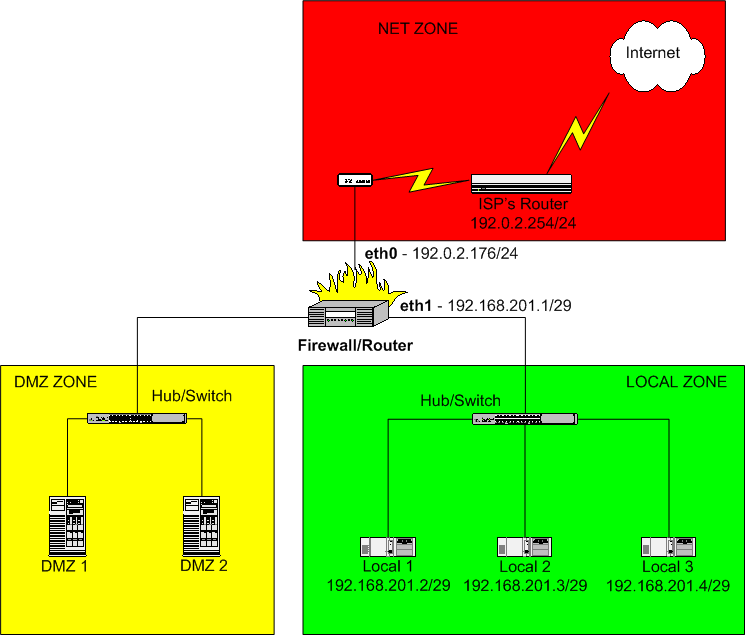
The local zone has been subnetted as 192.168.201.0/29 (netmask 255.255.255.248).
|
| The systems in the local zone would be configured with a default gateway of 192.168.201.1 (the IP address of the firewall's local interface). |
|
SNAT is configured in Shorewall using the /etc/shorewall/masq
file (/etc/shorewall/snat when
running Shorewall 5.0.14 or later): |
#INTERFACE     SOURCE               ADDRESS
eth0           192.168.201.0/29     192.0.2.176
When running Shorewall 5.0.14 or later, the equivalent
/etc/shorewall/snat is:
#ACTION                SOURCE            DEST                PROTO   PORT
SNAT(192.0.2.176)      192.168.201.0/24  eth0
This example used the normal technique of assigning the same public IP address for the firewall external interface and for SNAT. If you wanted to use a different IP address, you would either have to use your distributions network configuration tools to add that IP address to the external interface or you could set ADD_SNAT_ALIASES=Yes in /etc/shorewall/shorewall.conf and Shorewall will add the address for you.
When SNAT is used, it is impossible for hosts on the Internet to initiate a connection to one of the internal systems since those systems do not have a public IP address. DNAT provides a way to allow selected connections from the Internet.
Suppose that your daughter wants to run a web server on her
system “Local 3”. You could allow connections to the
Internet to her server by adding the following entry in
/etc/shorewall/rules:
#ACTION  SOURCE  DEST               PROTO  DPORT   SPORT     ORIGDEST
DNAT     net     loc:192.168.201.4  tcp    www
If one of your daughter's friends at address A wants to access your daughter's server, she can connect to http://192.0.2.176 (the firewall's external IP address) and the firewall will rewrite the destination IP address to 192.168.201.4 (your daughter's system) and forward the request. When your daughter's server responds, the firewall will rewrite the source address back to 192.0.2.176 and send the response back to A.
This example used the firewall's external IP address for DNAT. You can use another of your public IP addresses (place it in the ORIGDEST column in the rule above) but Shorewall will not add that address to the firewall's external interface for you.
Important
When testing DNAT rules like those shown above, you must test from a client OUTSIDE YOUR FIREWALL (in the 'net' zone). You cannot test these rules from inside the firewall!
For DNAT troubleshooting tips, see FAQs 1a and 1b.
The idea behind Proxy ARP is that:
A host H behind your firewall is assigned one of your public IP addresses (A), and is assigned the same netmask (M) as the firewall's external interface.
The firewall responds to ARP “who has” requests for A from machines outside of the firewall.
When H issues an ARP “who has” request for a machine with an address in the network defined by M where the target machine is outside of the firewall, the firewall will respond to H (with the MAC of the firewall interface that H is connected to).
For a more complete description of how Proxy ARP works, please see the Shorewall Proxy Documentation.
Let us suppose that we decide to use Proxy ARP on the DMZ in our example network.
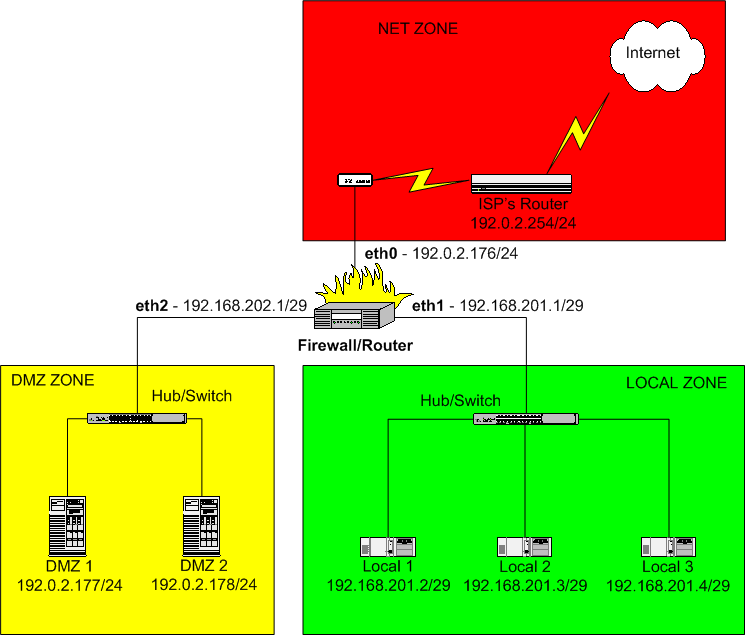
Here, we've assigned the IP addresses 192.0.2.177 to system DMZ 1 and 192.0.2.178 to DMZ 2. Notice that we've just assigned an arbitrary RFC 1918 IP address and subnet mask to the DMZ interface on the firewall. That address and netmask isn't relevant - just be sure it doesn't overlap another subnet that you've defined.
The Shorewall configuration of Proxy ARP is done using the/etc/shorewall/proxyarp
file.
#ADDRESS     INTERFACE    EXTERNAL      HAVEROUTE            PERSISTENT
192.0.2.177  eth2         eth0          No
192.0.2.178  eth2         eth0          No
Because the HAVE ROUTE column contains No, Shorewall will add host routes thru eth2 to 192.0.2.177 and 192.0.2.178. The Ethernet interfaces on DMZ 1 and DMZ 2 should be configured to have the IP addresses shown but should have the same default gateway as the firewall itself -- namely 192.0.2.254. In other words, they should be configured just like they would be if they were parallel to the firewall rather than behind it.
Caution
Do not add the Proxy ARP'ed address(es) (192.0.2.177 and 192.0.2.178 in the above example) to the external interface (eth0 in this example) of the firewall.
A word of warning is in order here. ISPs typically configure their routers with a long ARP cache timeout. If you move a system from parallel to your firewall to behind your firewall with Proxy ARP, it will probably be HOURS before that system can communicate with the Internet. There are a couple of things that you can try:
(Courtesy of Bradey Honsinger) A reading of Stevens' TCP/IP Illustrated, Vol 1 reveals that a
“gratuitous” ARP packet should cause the ISP's router to refresh their ARP cache (section 4.7). A gratuitous ARP is simply a host requesting the MAC address for its own IP; in addition to ensuring that the IP address isn't a duplicate,...
“if the host sending the gratuitous ARP has just changed its hardware address..., this packet causes any other host...that has an entry in its cache for the old hardware address to update its ARP cache entry accordingly.”
Which is, of course, exactly what you want to do when you switch a host from being exposed to the Internet to behind Shorewall using proxy ARP (or one-to-one NAT for that matter). Happily enough, recent versions of Redhat's iputils package include “arping”, whose “-U” flag does just that:
arping -U -I <net if> <newly proxied IP>

arping -U -I eth0 66.58.99.83 # for example
Stevens goes on to mention that not all systems respond correctly to gratuitous ARPs, but googling for “arping -U” seems to support the idea that it works most of the time.
You can call your ISP and ask them to purge the stale ARP cache entry but many either can't or won't purge individual entries.
You can determine if your ISP's gateway ARP cache is stale using ping and tcpdump. Suppose that we suspect that the gateway router has a stale ARP cache entry for 192.0.2.177. On the firewall, run tcpdump as follows:
tcpdump -nei eth0 icmpNow from 192.0.2.177, ping the ISP's gateway (which we will assume is 192.0.2.254):
ping 192.0.2.254We can now observe the tcpdump output:
13:35:12.159321 0:4:e2:20:20:33 0:0:77:95:dd:19 ip 98:
                192.0.2.177 > 192.0.2.254: icmp: echo request (DF)
13:35:12.207615 0:0:77:95:dd:19 0:c0:a8:50:b2:57 ip 98:
                192.0.2.254 > 192.0.2.177 : icmp: echo reply
Notice that the source MAC address in the echo request is different from the destination MAC address in the echo reply!! In this case 0:4:e2:20:20:33 was the MAC of the firewall's eth0 NIC while 0:c0:a8:50:b2:57 was the MAC address of DMZ 1. In other words, the gateway's ARP cache still associates 192.0.2.177 with the NIC in DMZ 1 rather than with the firewall's eth0.
With one-to-one NAT, you assign local systems RFC 1918 addresses then establish a one-to-one mapping between those addresses and public IP addresses. For outgoing connections SNAT (Source Network Address Translation) occurs and on incoming connections DNAT (Destination Network Address Translation) occurs. Let's go back to our earlier example involving your daughter's web server running on system Local 3.
Recall that in this setup, the local network is using SNAT and
is sharing the firewall external IP (192.0.2.176) for outbound
connections. This is done with the following entry in
/etc/shorewall/masq:
#INTERFACE     SOURCE               ADDRESS
eth0           192.168.201.0/29     192.0.2.176
When running Shorewall 5.0.14 or later, the equivalent
/etc/shorewall/snat is:
#ACTION                SOURCE            DEST                PROTO   PORT
SNAT(192.0.2.176)      192.168.201.0/24  eth0
Suppose now that you have decided to give your daughter her own
IP address (192.0.2.179) for both inbound and outbound connections.
You would do that by adding an entry in /etc/shorewall/nat.
#EXTERNAL   INTERFACE   INTERNAL       ALLINTS          LOCAL
192.0.2.179 eth0        192.168.201.4  No               No
With this entry in place, you daughter has her own IP address and the other two local systems share the firewall's IP address.
Once the relationship between 192.0.2.179 and 192.168.201.4 is established by the nat file entry above, it is no longer appropriate to use a DNAT rule for you daughter's web server -- you would rather just use an ACCEPT rule:
#ACTION  SOURCE  DEST               PROTO  DEST    SPORT     ORIGDEST
ACCEPT   net     loc:192.168.201.4  tcp    www
A word of warning is in order here. ISPs typically configure their routers with a long ARP cache timeout. If you move a system from parallel to your firewall to behind your firewall with one-to-one NAT, it will probably be HOURS before that system can communicate with the Internet. There are a couple of things that you can try:
(Courtesy of Bradey Honsinger) A reading of Stevens' TCP/IP Illustrated, Vol 1 reveals that a
“gratuitous” ARP packet should cause the ISP's router to refresh their ARP cache (section 4.7). A gratuitous ARP is simply a host requesting the MAC address for its own IP; in addition to ensuring that the IP address isn't a duplicate,...
“if the host sending the gratuitous ARP has just changed its hardware address..., this packet causes any other host...that has an entry in its cache for the old hardware address to update its ARP cache entry accordingly.”
Which is, of course, exactly what you want to do when you switch a host from being exposed to the Internet to behind Shorewall using one-to-one NAT. Happily enough, recent versions of Redhat's iputils package include “arping”, whose “-U” flag does just that:
arping -U -I <net if> <newly proxied IP>

arping -U -I eth0 66.58.99.83 # for example
Stevens goes on to mention that not all systems respond correctly to gratuitous ARPs, but googling for “arping -U” seems to support the idea that it works most of the time.
You can call your ISP and ask them to purge the stale ARP cache entry but many either can't or won't purge individual entries.
You can determine if your ISP's gateway ARP cache is stale using ping and tcpdump. Suppose that we suspect that the gateway router has a stale ARP cache entry for 192.0.2.177. On the firewall, run tcpdump as follows:
tcpdump -nei eth0 icmpNow from 192.0.2.177, ping the ISP's gateway (which we will assume is 192.0.2.254):
ping 192.0.2.254We can now observe the tcpdump output:
13:35:12.159321 0:4:e2:20:20:33 0:0:77:95:dd:19 ip 98:
                192.0.2.177 > 192.0.2.254: icmp: echo request (DF)
13:35:12.207615 0:0:77:95:dd:19 0:c0:a8:50:b2:57 ip 98:
                192.0.2.254 > 192.0.2.177 : icmp: echo reply
Notice that the source MAC address in the echo request is different from the destination MAC address in the echo reply!! In this case 0:4:e2:20:20:33 was the MAC of the firewall's eth0 NIC while 0:c0:a8:50:b2:57 was the MAC address of DMZ 1. In other words, the gateway's ARP cache still associates 192.0.2.177 with the NIC in DMZ 1 rather than with the firewall's eth0.
Note
Shorewall has a macro facility that includes macros for many standard applications. This section does not use those macros but rather defines the rules directly.
With the default policies described earlier in this document, your local systems (Local 1-3) can access any server on the Internet and the DMZ can't access any other host (including the firewall). With the exception of DNAT rules which cause address translation and allow the translated connection request to pass through the firewall, the way to allow connection requests through your firewall is to use ACCEPT rules.
Note
Since the SPORT and ORIGDEST. Columns aren't used in this section, they won't be shown
You probably want to allow ping between your zones:
#ACTION  SOURCE  DEST               PROTO  DPORT
ACCEPT   net     dmz                icmp   echo-request
ACCEPT   net     loc                icmp   echo-request
ACCEPT   dmz     loc                icmp   echo-request
ACCEPT   loc     dmz                icmp   echo-request
Let's suppose that you run mail and pop3 servers on DMZ 2 and a Web Server on DMZ 1. The rules that you would need are:
#ACTION  SOURCE          DEST               PROTO  DPORT
ACCEPT   net             dmz:192.0.2.178    tcp    smtp    #Mail from
                                                           #Internet
ACCEPT   net             dmz:192.0.2.178    tcp    pop3    #Pop3 from
                                                           #Internet
ACCEPT   loc             dmz:192.0.2.178    tcp    smtp    #Mail from local
                                                           #Network
ACCEPT   loc             dmz:192.0.2.178    tcp    pop3    #Pop3 from local
                                                           #Network
ACCEPT   $FW             dmz:192.0.2.178    tcp    smtp    #Mail from the
                                                           #Firewall
ACCEPT   dmz:192.0.2.178 net                tcp    smtp    #Mail to the
                                                           #Internet
ACCEPT   net             dmz:192.0.2.177    tcp    http    #WWW from
                                                           #Internet
ACCEPT   net             dmz:192.0.2.177    tcp    https   #Secure WWW
                                                           #from Internet
ACCEPT   loc             dmz:192.0.2.177    tcp    https   #Secure WWW
                                                           #from local
                                                           #Network
If you run a public DNS server on 192.0.2.177, you would need to add the following rules:
#ACTION  SOURCE          DEST               PROTO  DPORT
ACCEPT   net             dmz:192.0.2.177    udp    domain  #UDP DNS from
                                                           #Internet
ACCEPT   net             dmz:192.0.2.177    tcp    domain  #TCP DNS from
                                                           #Internet
ACCEPT   loc             dmz:192.0.2.177    udp    domain  #UDP DNS from
                                                           #Local Network
ACCEPT   loc             dmz:192.0.2.177    tcp    domain  #TCP DNS from
                                                           #Local Network
ACCEPT   $FW             dmz:192.0.2.177    udp    domain  #UDP DNS from
                                                           #the Firewall
ACCEPT   $FW             dmz:192.0.2.177    tcp    domain  #TCP DNS from
                                                           #the Firewall
ACCEPT   dmz:192.0.2.177 net                udp    domain  #UDP DNS to
                                                           #the Internet
ACCEPT   dmz:192.0.2.177 net                tcp    domain  #TCPP DNS to
                                                           #the Internet
You probably want some way to communicate with your firewall and DMZ systems from the local network -- I recommend SSH which through its scp utility can also do publishing and software update distribution.
#ACTION  SOURCE          DEST               PROTO  DPORT
ACCEPT   loc             dmz                tcp    ssh     #SSH to the DMZ
ACCEPT   net             $FW                tcp    ssh     #SSH to the
#FirewallThe above discussion reflects my personal preference for using Proxy ARP for my servers in my DMZ and SNAT/NAT for my local systems. I prefer to use NAT only in cases where a system that is part of an RFC 1918 subnet needs to have its own public IP.
If you haven't already, it would be a good idea to browse through
/etc/shorewall/shorewall.conf
just to see if there is anything there that might be of interest. You
might also want to look at the other configuration files that you
haven't touched yet just to get a feel for the other things that
Shorewall can do.
In case you haven't been keeping score, here's the final set of configuration files for our sample network. Only those that were modified from the original installation are shown.
/etc/shorewall/interfaces (The
“options” will be very site-specific).
?FORMAT 2
#ZONE    INTERFACE      OPTIONS
net      eth0           routefilter
loc      eth1
dmz      eth2
/etc/shorewall/masq - Local Subnet
#INTERFACE     SUBNET               ADDRESS
eth0           192.168.201.0/29     192.0.2.176
When running Shorewall 5.0.14 or later, the equivalent
/etc/shorewall/snat is:
#ACTION                SOURCE            DEST                PROTO   PORT
SNAT(192.02.176)       192.168.201.0/24  eth0
/etc/shorewall/proxyarp - DMZ
#ADDRESS     EXTERNAL     INTERFACE     HAVE ROUTE
192.0.2.177  eth2         eth0          No
192.0.2.178  eth2         eth0          No
/etc/shorewall/nat- Daughter's System
#EXTERNAL   INTERFACE   INTERNAL       ALL INTERFACES   LOCAL
192.0.2.179 eth0        192.168.201.4  No               No
/etc/shorewall/rules
#ACTION  SOURCE          DEST               PROTO  DPORT
ACCEPT   net             dmz                icmp   echo-request
ACCEPT   net             loc                icmp   echo-request
ACCEPT   dmz             loc                icmp   echo-request
ACCEPT   loc             dmz                icmp   echo-request
ACCEPT   net             loc:192.168.201.4  tcp    www     #Daughter's
                                                           #Server
ACCEPT   net             dmz:192.0.2.178    tcp    smtp    #Mail from
                                                           #Internet
ACCEPT   net             dmz:192.0.2.178    tcp    pop3    #Pop3 from
                                                           #Internet
ACCEPT   loc             dmz:192.0.2.178    tcp    smtp    #Mail from local
                                                           #Network
ACCEPT   loc             dmz:192.0.2.178    tcp    pop3    #Pop3 from local
                                                           #Network
ACCEPT   $FW             dmz:192.0.2.178    tcp    smtp    #Mail from the
                                                           #Firewall
ACCEPT   dmz:192.0.2.178 net                tcp    smtp    #Mail to the
                                                           #Internet
ACCEPT   net             dmz:192.0.2.177    tcp    http    #WWW from
                                                           #Internet
ACCEPT   net             dmz:192.0.2.177    tcp    https   #Secure WWW
                                                           #from Internet
ACCEPT   loc             dmz:192.0.2.177    tcp    https   #Secure WWW
                                                           #from local
                                                           #Network
ACCEPT   net             dmz:192.0.2.177    udp    domain  #UDP DNS from
                                                           #Internet
ACCEPT   net             dmz:192.0.2.177    tcp    domain  #TCP DNS from
                                                           #Internet
ACCEPT   loc             dmz:192.0.2.177    udp    domain  #UDP DNS from
                                                           #Local Network
ACCEPT   loc             dmz:192.0.2.177    tcp    domain  #TCP DNS from
                                                           #Local Network
ACCEPT   $FW             dmz:192.0.2.177    udp    domain  #UDP DNS from
                                                           #the Firewall
ACCEPT   $FW             dmz:192.0.2.177    tcp    domain  #TCP DNS from
                                                           #the Firewall
ACCEPT   dmz:192.0.2.177 net                udp    domain  #UDP DNS to
                                                           #the Internet
ACCEPT   dmz:192.0.2.177 net                tcp    domain  #TCPP DNS to
                                                           #the Internet
ACCEPT   loc             dmz                tcp    ssh     #SSH to the DMZ
ACCEPT   net             $FW                tcp    ssh     #SSH to the
#FirewallGiven the collection of RFC 1918 and public addresses in this setup, it only makes sense to have separate internal and external DNS servers. You can combine the two into a single BIND 9 server using Views. If you are not interested in Bind 9 views, you can go to the next section.
Suppose that your domain is foobar.net and you want the two DMZ systems named www.foobar.net and mail.foobar.net and you want the three local systems named "winken.foobar.net, blinken.foobar.net and nod.foobar.net. You want your firewall to be known as firewall.foobar.net externally and its interface to the local network to be know as gateway.foobar.net and its interface to the dmz as dmz.foobar.net. Let's have the DNS server on 192.0.2.177 which will also be known by the name ns1.foobar.net.
The /etc/named.conf file would look like
this:
options {
        directory "/var/named";
        listen-on { 127.0.0.1 ; 192.0.2.177; };
        transfer-format many-answers;
        max-transfer-time-in 60;

allow-transfer {
        // Servers allowed to request zone transfers
       <secondary NS IP>; };
};

logging {
        channel xfer-log {
                file "/var/log/named/bind-xfer.log";
                print-category yes;
                print-severity yes;
                print-time yes;
                severity info;
};

        category xfer-in { xfer-log; };
        category xfer-out { xfer-log; };
        category notify { xfer-log; };
};

#
# This is the view presented to our internal systems
#

view "internal" {
        #
        # These are the clients that see this view
        #
        match-clients { 192.168.201.0/29;
                        192.168.202.0/29;
                        127.0.0.0/8;
                        192.0.2.176/32;
                        192.0.2.178/32;
                        192.0.2.179/32;
                        192.0.2.180/32; };
        #
        # If this server can't complete the request, it should use
        # outside servers to do so
        #
        recursion yes;

        zone "." in {
                type hint;
                file "int/root.cache";
        };

        zone "foobar.net" in {
                type master;
                notify no;
                allow-update { none; };
                file "int/db.foobar";
        };

        zone "0.0.127.in-addr.arpa" in {
                type master;
                notify no;
                allow-update { none; };
                file "int/db.127.0.0";
        };

        zone "201.168.192.in-addr.arpa" in {
                type master;
                notify no;
                allow-update { none; };
                file "int/db.192.168.201";
        };

        zone "202.168.192.in-addr.arpa" in {
                type master;
                notify no;
                allow-update { none; };
                file "int/db.192.168.202";
        };

        zone "176.2.0.192.in-addr.arpa" in {
                type master;
                notify no;
                allow-update { none; };
                file "db.192.0.2.176";
        };

        zone "177.2.0.192.in-addr.arpa" in {
                type master;
                notify no;
                allow-update { none; };
                file "db.192.0.2.177";
        };

        zone "178.2.0.192.in-addr.arpa" in {
                type master;
                notify no;
                allow-update { none; };
                file "db.192.0.2.178";
        };

        zone "179.2.0.192.in-addr.arpa" in {
                type master;
                notify no;
                allow-update { none; };
                file "db.206.124.146.179";
        };

};
#
# This is the view that we present to the outside world
#
view "external" {
         match-clients { any; };
         #
         # If we can't answer the query, we tell the client so
         #
         recursion no;

         zone "foobar.net" in {
                 type master;
                 notify yes;
                 allow-update {none; };
                 file "ext/db.foobar";
         };

         zone "176.2.0.192.in-addr.arpa" in {
                 type master;
                 notify yes;
                 allow-update { none; };
                 file "db.192.0.2.176";
         };

         zone "177.2.0.192.in-addr.arpa" in {
                 type master;
                 notify yes;
                 allow-update { none; };
                 file "db.192.0.2.177";
         };

         zone "178.2.0.192.in-addr.arpa" in {
                 type master;
                 notify yes;
                 allow-update { none; };
                 file "db.192.0.2.178";
         };

         zone "179.2.0.192.in-addr.arpa" in {
                 type master;
                 notify yes;
                 allow-update { none; };
                 file "db.192.0.2.179";
         };
};
Here are the files in /var/named (those not shown are usually
included in your bind distribution).
db.192.0.2.176 - This is the reverse zone for
the firewall's external interface
; ############################################################
; Start of Authority (Inverse Address Arpa) for 192.0.2.176/32
; Filename: db.192.0.2.176
; ############################################################
@ 604800 IN SOA ns1.foobar.net. netadmin.foobar.net. (
                        2001102303 ; serial
                        10800 ; refresh (3 hour)
                        3600 ; retry (1 hour)
                        604800 ; expire (7 days)
                        86400 ) ; minimum (1 day)
;
; ############################################################
; Specify Name Servers for all Reverse Lookups (IN-ADDR.ARPA)
; ############################################################
@        604800  IN NS   ns1.foobar.net.
@        604800  IN NS   <name of secondary ns>.
;
; ############################################################
; Inverse Address Arpa Records (PTR's)
; ############################################################
176.2.0.192.in-addr.arpa. 86400 IN PTR firewall.foobar.net.
db.192.0.2.177 - Reverse zone www server
; ############################################################
; Start of Authority (Inverse Address Arpa) for 192.0.2.177/32
; Filename: db.192.0.2.177
; ############################################################
@ 604800 IN SOA ns1.foobar.net. netadmin.foobar.net. (
                        2001102303 ; serial
                        10800 ; refresh (3 hour)
                        3600 ; retry (1 hour)
                        604800 ; expire (7 days)
                        86400 ) ; minimum (1 day)
;
; ############################################################
; Specify Name Servers for all Reverse Lookups (IN-ADDR.ARPA)
; ############################################################
@        604800  IN NS   ns1.foobar.net.
@        604800  IN NS   <name of secondary ns>.
;
; ############################################################
; Inverse Address Arpa Records (PTR's)
; ############################################################
177.2.0.192.in-addr.arpa. 86400 IN PTR www.foobar.net.
db.192.0.2.178 - Reverse zone for the mail
server
; ############################################################
; Start of Authority (Inverse Address Arpa) for 192.0.2.178/32
; Filename: db.192.0.2.178
; ############################################################
@ 604800 IN SOA ns1.foobar.net. netadmin.foobar.net. (
                      2001102303 ; serial
                      10800 ; refresh (3 hour)
                      3600 ; retry (1 hour)
                      604800 ; expire (7 days)
                      86400 ) ; minimum (1 day)
;
; ############################################################
; Specify Name Servers for all Reverse Lookups (IN-ADDR.ARPA)
; ############################################################
@        604800  IN NS   ns1.foobar.net.
@        604800  IN NS   <name of secondary ns>.
;
; ############################################################
; Inverse Address Arpa Records (PTR's)
; ############################################################
178.2.0.192.in-addr.arpa. 86400 IN PTR mail.foobar.net.
db.192.0.2.179 - Reverse zone for Daughter's
public web server
; ############################################################
; Start of Authority (Inverse Address Arpa) for 192.0.2.179/32
; Filename: db.192.0.2.179
; ############################################################
@ 604800 IN SOA ns1.foobar.net. netadmin.foobar.net. (
                      2001102303 ; serial
                      10800 ; refresh (3 hour)
                      3600 ; retry (1 hour)
                      604800 ; expire (7 days)
                      86400 ) ; minimum (1 day)
;
; ############################################################
; Specify Name Servers for all Reverse Lookups (IN-ADDR.ARPA)
; ############################################################
@        604800  IN NS   ns1.foobar.net.
@        604800  IN NS   <name of secondary ns>.
;
; ############################################################
; Inverse Address Arpa Records (PTR's)
; ############################################################
179.2.0.192.in-addr.arpa. 86400 IN PTR nod.foobar.net.
int/db.127.0.0 - Reverse zone for
localhost
; ############################################################
; Start of Authority (Inverse Address Arpa) for 127.0.0.0/8
; Filename: db.127.0.0
; ############################################################
@ 604800 IN SOA ns1.foobar.net. netadmin.foobar.net. (
                             2001092901 ; serial
                             10800 ; refresh (3 hour)
                             3600 ; retry (1 hour)
                             604800 ; expire (7 days)
                             86400 ) ; minimum (1 day)
; ############################################################
; Specify Name Servers for all Reverse Lookups (IN-ADDR.ARPA)
; ############################################################
@     604800          IN NS   ns1.foobar.net.

; ############################################################
; Inverse Address Arpa Records (PTR's)
; ############################################################
1       86400           IN PTR  localhost.foobar.net.
int/db.192.168.201 - Reverse zone for the local
network. This is only shown to internal clients.
; ############################################################
; Start of Authority (Inverse Address Arpa) for 192.168.201.0/29
; Filename: db.192.168.201
; ############################################################
@ 604800 IN SOA ns1.foobar.net netadmin.foobar.net. (
                                2002032501 ; serial
                                10800 ; refresh (3 hour)
                                3600 ; retry (1 hour)
                                604800 ; expire (7 days)
                                86400 ) ; minimum (1 day)

; ############################################################
; Specify Name Servers for all Reverse Lookups (IN-ADDR.ARPA)
; ############################################################
@       604800          IN NS   ns1.foobar.net.
; ############################################################
; Inverse Address Arpa Records (PTR's)
; ############################################################
1       86400           IN PTR  gateway.foobar.net.
2       86400           IN PTR  winken.foobar.net.
3       86400           IN PTR  blinken.foobar.net.
4       86400           IN PTR  nod.foobar.net.
int/db.192.168.202 - Reverse zone for the
firewall's DMZ Interface
; ############################################################
; Start of Authority (Inverse Address Arpa) for 192.168.202.0/29
; Filename: db.192.168.202
; ############################################################
@ 604800 IN SOA ns1.foobar.net netadmin.foobar.net. (
                                2002032501 ; serial
                                10800 ; refresh (3 hour)
                                3600 ; retry (1 hour)
                                604800 ; expire (7 days)
                                86400 ) ; minimum (1 day)

; ############################################################
; Specify Name Servers for all Reverse Lookups (IN-ADDR.ARPA)
; ############################################################
@             604800  IN NS   ns1.foobar.net.

; ############################################################
; Inverse Address Arpa Records (PTR's)
; ############################################################
1               86400 IN PTR  dmz.foobar.net.
int/db.foobar - Forward zone for internal
clients.
;##############################################################
; Start of Authority for foobar.net.
; Filename: db.foobar
;##############################################################
@ 604800 IN SOA ns1.foobar.net. netadmin.foobar.net. (
                        2002071501 ; serial
                        10800 ; refresh (3 hour)
                        3600 ; retry (1 hour)
                        604800 ; expire (7 days)
                        86400 ); minimum (1 day)
;############################################################
; foobar.net Nameserver Records (NS)
;############################################################
@                 604800  IN NS   ns1.foobar.net.

;############################################################
; Foobar.net Office Records (ADDRESS)
;############################################################
localhost 86400   IN A    127.0.0.1

firewall       86400   IN A    192.0.2.176
www            86400   IN A    192.0.2.177
ns1            86400   IN A    192.0.2.177
mail           86400   IN A    192.0.2.178

gateway        86400   IN A    192.168.201.1
winken         86400   IN A    192.168.201.2
blinken        86400   IN A    192.168.201.3
nod            86400   IN A    192.168.201.4

dmz            86400   IN A    192.168.202.1
ext/db.foobar - Forward zone for external
clients.
;##############################################################
; Start of Authority for foobar.net.
; Filename: db.foobar
;##############################################################
@ 86400 IN SOA ns1.foobar.net. netadmin.foobar.net. (
                        2002052901 ; serial
                        10800 ; refresh (3 hour)
                        3600 ; retry (1 hour)
                        604800 ; expire (7 days)
                        86400 ); minimum (1 day)
;############################################################
; Foobar.net Nameserver Records (NS)
;############################################################
@                86400   IN NS   ns1.foobar.net.
@                86400   IN NS   <secondary NS>.
;############################################################
; Foobar.net        Foobar Wa Office Records (ADDRESS)
;############################################################
localhost         86400   IN A    127.0.0.1
;
; The firewall itself
;
firewall          86400   IN A    192.0.2.176
;
; The DMZ
;
ns1               86400   IN A    192.0.2.177
www               86400   IN A    192.0.2.177
mail              86400   IN A    192.0.2.178
;
; The Local Network
;
nod             86400   IN A    192.0.2.179

;############################################################
; Current Aliases for foobar.net (CNAME)
;############################################################

;############################################################
; foobar.net MX Records (MAIL EXCHANGER)
;############################################################
foobar.net.      86400   IN A    192.0.2.177
                 86400   IN MX 0 mail.foobar.net.
86400 IN MX 1 <backup MX>.You cannot test your firewall from the inside. Just because you send requests to your firewall external IP address does not mean that the request will be associated with the external interface or the “net” zone. Any traffic that you generate from the local network will be associated with your local interface and will be treated as loc->$FW traffic.
IP addresses are properties of systems, not of interfaces. It is a mistake to believe that your firewall is able to forward packets just because you can ping the IP address of all of the firewall's interfaces from the local network. The only conclusion you can draw from such pinging success is that the link between the local system and the firewall works and that you probably have the local system's default gateway set correctly.
All IP addresses configured on firewall interfaces are in the $FW (fw) zone. If 192.168.1.254 is the IP address of your internal interface then you can write “$FW:192.168.1.254” in a rule but you may not write “loc:192.168.1.254”. Similarly, it is nonsensical to add 192.168.1.254 to the loc zone using an entry in
/etc/shorewall/hosts.Reply packets do NOT automatically follow the reverse path of the one taken by the original request. All packets are routed according to the routing table of the host at each step of the way. This issue commonly comes up when people install a Shorewall firewall parallel to an existing gateway and try to use DNAT through Shorewall without changing the default gateway of the system receiving the forwarded requests. Requests come in through the Shorewall firewall where the destination IP address gets rewritten but replies go out unmodified through the old gateway.
Shorewall itself has no notion of inside or outside. These concepts are embodied in how Shorewall is configured.
The Installation procedure configures your system to start Shorewall at system boot.
The firewall is started using the “shorewall start”
command and stopped using “shorewall stop”. When the firewall
is stopped, routing is enabled on those hosts that have an ACCEPT entry in
/etc/shorewall/stoppedrules.
A running firewall may be restarted using the “shorewall
restart” command. If you want to totally remove any trace of
Shorewall from your Netfilter configuration, use “shorewall
clear”.
Edit the /etc/shorewall/stoppedrules
file and add ACCEPT rules for those systems that you want to be able to
access the firewall when it is stopped.
Caution
If you are connected to your firewall from the Internet, do not
issue a “shorewall stop” command unless you have added an
ACCEPT entry for the IP address that you are connected from to
/etc/shorewall/stoppedrules.
Also, I don't recommend using “shorewall restart”; it is
better to create an an alternate
configuration and test it using the “shorewall
try” command.