Copyright © 2003-2004, 2008, 2009, 2012 Eric de Thouars and Tom Eastep
Permission is granted to copy, distribute and/or modify this document under the terms of the GNU Free Documentation License, Version 1.2 or any later version published by the Free Software Foundation; with no Invariant Sections, with no Front-Cover, and with no Back-Cover Texts. A copy of the license is included in the section entitled “GNU Free Documentation License”.
2020/02/16
Table of Contents
6to4 tunneling with Shorewall can be used to connect your IPv6 network to another IPv6 network over an IPv4 infrastructure. It can also allow you to experiment with IPv6 even if your ISP doesn't provide IPv6 connectivity.
More information on Linux and IPv6 can be found in the Linux IPv6 HOWTO. Details on how to setup a 6to4 tunnels are described in the section Setup of 6to4 tunnels.
6to4 tunnels provide a good way to introduce yourself to IPv6. Shorewall6 was developed on a network whose only IPv6 connectivity was an 6to4 Tunnel; that network is described in the remainder of this section. What is shown here requires Shorewall6 4.2.4 or later.
I have created an init script to make the job of configuring your firewall for IPv6 easier.
The script is installed in /etc/init.d and configures ipv6, including a 6to4 tunnel, at boot time. Note that the script is included in the Shorewall6 distribution but is not installed in /etc/init.d by default. The RPMs from shorewall.net, install the file in the package documentation directory.
The script works on OpenSuSE 11.0 and may need modification for
other distributions. On OpenSuSE, the script is installed by copying it
to /etc/init.d/ then running the command 'chkconfig
--add ipv6'.
At the top of the script, you will see several variables:
SIT - The name of the tunnel device. Usually 'sit1'
INTERFACES - local interfaces that you want to configure for IPv6
ADDRESS4 - A static IPv4 address on your firewall that you want to use for the tunnel.
SLA - The identity of the first local sub-network that you want to assign to the interfaces listed in INTERFACES. Normally one (0001).
GATEWAY - The default IPv6 gateway. For 6to4, this is ::192.88.99.1.
Here is the file from my firewall:
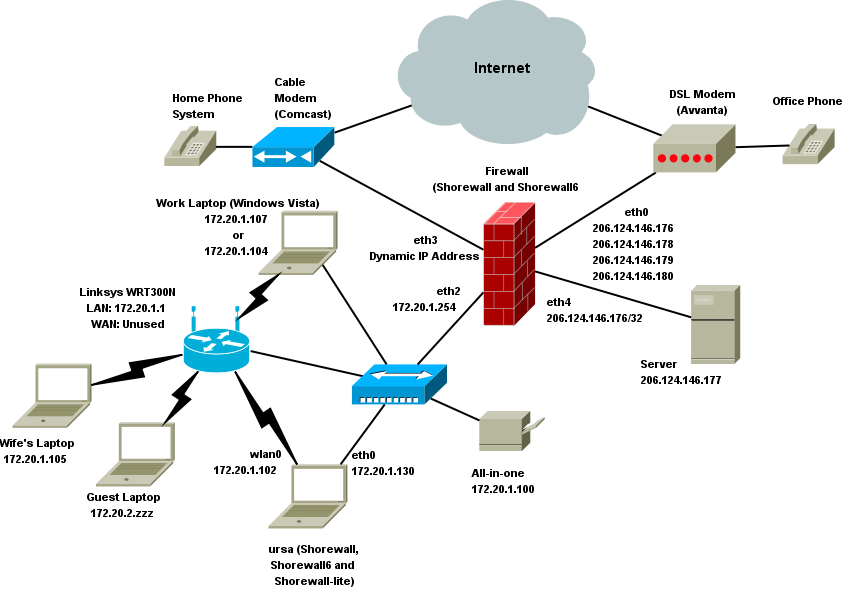
SIT="sit1"
ADDRESS4=206.124.146.180
INTERFACES="eth2 eth4"
SLA=1
GATEWAY=::192.88.99.1
eth2 is the interface to my local network (both wired and wireless). eth4 goes to my DMZ which holds a single server. Here is a diagram of the IPv4 network:
Here is the configuration after IPv6 is configured; the part in bold font is configured by the /etc/init.d/ipv6 script.
gateway:~ # ip -6 addr ls
1: lo: <LOOPBACK,UP,LOWER_UP> mtu 16436
    inet6 ::1/128 scope host
       valid_lft forever preferred_lft forever
1: eth1: <BROADCAST,MULTICAST,UP,LOWER_UP> mtu 1500 qlen 1000
    inet6 fe80::202:e3ff:fe08:484c/64 scope link
       valid_lft forever preferred_lft forever
2: eth2: <BROADCAST,MULTICAST,UP,LOWER_UP> mtu 1500 qlen 1000
    inet6 2002:ce7c:92b4:1::1/64 scope global
       valid_lft forever preferred_lft forever
    inet6 fe80::202:e3ff:fe08:55fa/64 scope link
       valid_lft forever preferred_lft forever
3: eth4: <BROADCAST,MULTICAST,UP,LOWER_UP> mtu 1500 qlen 1000
    inet6 2002:ce7c:92b4:2::1/64 scope global
       valid_lft forever preferred_lft forever
    inet6 fe80::2a0:ccff:fed2:353a/64 scope link
       valid_lft forever preferred_lft forever
4: sit1@NONE: <NOARP,UP,LOWER_UP> mtu 1480
    inet6 ::206.124.146.180/128 scope global
       valid_lft forever preferred_lft forever
    inet6 2002:ce7c:92b4::1/128 scope global
       valid_lft forever preferred_lft forever
gateway:~ # ip -6 route ls
::/96 via :: dev sit1  metric 256  expires 21333315sec mtu 1480 advmss 1420 hoplimit 4294967295
2002:ce7c:92b4::1 dev sit1  metric 256  expires 21333315sec mtu 1480 advmss 1420 hoplimit 4294967295
2002:ce7c:92b4:1::/64 dev eth2  metric 256  expires 21333315sec mtu 1500 advmss 1440 hoplimit 4294967295
2002:ce7c:92b4:2::/64 dev eth4  metric 256  expires 21333315sec mtu 1500 advmss 1440 hoplimit 4294967295
fe80::/64 dev eth1  metric 256  expires 20748424sec mtu 1500 advmss 1440 hoplimit 4294967295
fe80::/64 dev eth2  metric 256  expires 20748431sec mtu 1500 advmss 1440 hoplimit 4294967295
fe80::/64 dev eth4  metric 256  expires 20748431sec mtu 1500 advmss 1440 hoplimit 4294967295
fe80::/64 dev sit1  metric 256  expires 21333315sec mtu 1480 advmss 1420 hoplimit 4294967295
default via ::192.88.99.1 dev sit1  metric 1  expires 21333315sec mtu 1480 advmss 1420 hoplimit 4294967295
gateway:~ #
You will notice that sit1, eth2 and eth4 each have an IPv6 address beginning with 2002: -- All 6to4 IPv6 addresses have that in their most significant 16 bits. The next 32-bits (ce7c:92b4) encode the IPv4 ADDRESS (206.124.146.180). So once you start the 6to4 tunnel, you are the proud owner of 280 IPv6 addresses! In the case shown here, 2002:ce7c:92b4::/48. The SLA is used to assign each interface in INTERFACES, a subnet of 264 addresses; in the case of eth2, 2002:ce7c:92b4:1::/64.
I run radvd on
the firewall to allow hosts conntected to eth2 and eth4 to automatically
perform their own IPv6 configuration. Here is my
/etc/radvd.conf file:
interface eth2 {
        AdvSendAdvert on;
        MinRtrAdvInterval 3;
        MaxRtrAdvInterval 10;
        prefix 2002:ce7c:92b4:1::/64 {
                AdvOnLink on;
                AdvAutonomous on;
                AdvRouterAddr off;
        };

        RDNSS 2002:ce7c:92b4:2:2a0:ccff:fedb:31c4 {
                AdvRDNSSOpen on;
                AdvRDNSSPreference 2;
        };
};

interface eth4 {
        AdvSendAdvert on;
        MinRtrAdvInterval 3;
        MaxRtrAdvInterval 10;
        prefix 2002:ce7c:92b4:2::/64 {
                AdvOnLink on;
                AdvAutonomous on;
                AdvRouterAddr off;
        };

        RDNSS 2002:ce7c:92b4:2:2a0:ccff:fedb:31c4 {
                AdvRDNSSOpen on;
                AdvRDNSSPreference 2;
        };
};
Note
radvd terminates immediately if IPv6 forwarding is not enabled.
So it is a good idea to include this in
/etc/sysctl.conf:
net.ipv6.conf.all.forwarding = 1
That way, if radvd starts before Shorewall6, it will continue to run.
An alternative is to modify
/etc/init.d/radvd so that radvd starts after
Shorewall6:
# Should-Start: shorewall6
Here is the automatic IPv6 configuration on my server attached to eth4:
webadmin@lists:~/ftpsite/contrib/IPv6> /sbin/ip -6 addr ls
1: lo: <LOOPBACK,UP,LOWER_UP> mtu 16436
    inet6 ::1/128 scope host
       valid_lft forever preferred_lft forever
2: eth2: <BROADCAST,MULTICAST,UP,LOWER_UP> mtu 1500 qlen 1000
    inet6 2002:ce7c:92b4:2:2a0:ccff:fedb:31c4/64 scope global dynamic
       valid_lft 2591995sec preferred_lft 604795sec
    inet6 fe80::2a0:ccff:fedb:31c4/64 scope link
       valid_lft forever preferred_lft forever
webadmin@lists:~/ftpsite/contrib/IPv6> /sbin/ip -6 route ls
2002:ce7c:92b4:2::/64 dev eth2  proto kernel  metric 256  expires 2592161sec mtu 1500 advmss 1440 hoplimit 4294967295
fe80::/64 dev eth2  metric 256  expires 20746963sec mtu 1500 advmss 1440 hoplimit 4294967295
fe80::/64 dev ifb0  metric 256  expires 20746985sec mtu 1500 advmss 1440 hoplimit 4294967295
default via fe80::2a0:ccff:fed2:353a dev eth2  proto kernel  metric 1024  expires 29sec mtu 1500 advmss 1440 hoplimit 64
webadmin@lists:~/ftpsite/contrib/IPv6>
You will note that the public IPv6 address of eth2 (2002:ce7c:92b4:2:2a0:ccff:fedb:31c4) was formed by concatenating the prefix for eth2 shown in radvd.conf (2002:ce7c:92b4:2) and the lower 64 bits of the link level address of eth2 (2a0:ccff:fedb:31c4). You will also notice that the address 2002:ce7c:92b4:2:2a0:ccff:fedb:31c4 appears in the RDNSS clauses in radvd.conf; that causes my server to be automatically configured as a DNS server.
The default route is described using the link level address of eth2 on the firewall (fe80::2a0:ccff:fed2:353a).
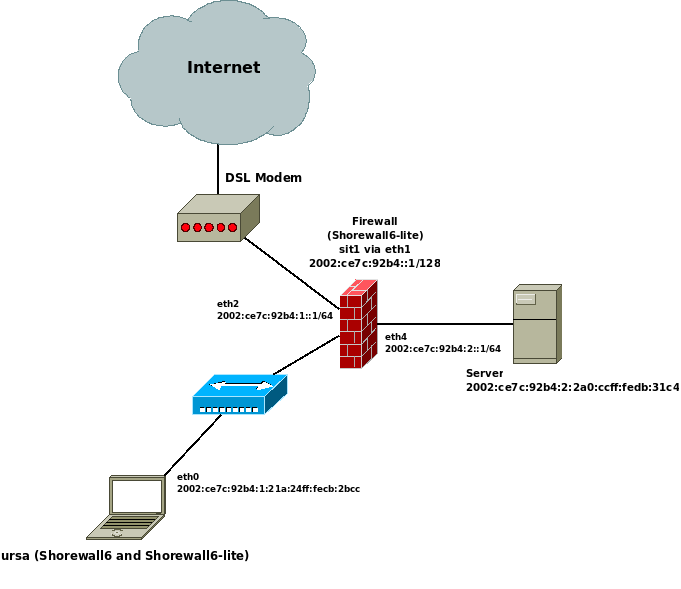
On my laptop, ursa:
ursa:~ # ip -6 addr ls dev eth0
3: eth0: <BROADCAST,MULTICAST,UP,LOWER_UP> mtu 1500 qlen 1000
    inet6 2002:ce7c:92b4:1:21a:24ff:fecb:2bcc/64 scope global dynamic
       valid_lft 2591996sec preferred_lft 604796sec
    inet6 fe80::21a:73ff:fedb:8c35/64 scope link
       valid_lft forever preferred_lft forever
ursa:~ # ip -6 route ls dev eth0
2002:ce7c:92b4:1::/64  proto kernel  metric 256  expires 2592160sec mtu 1500 advmss 1440 hoplimit 4294967295
fe80::/64  metric 256  expires 21314573sec mtu 1500 advmss 1440 hoplimit 4294967295
default via fe80::202:e3ff:fe08:55fa  proto kernel  metric 1024  expires 28sec mtu 1500 advmss 1440 hoplimit 64
ursa:~ #
Here is the resulting simple IPv6 Network:
In May 2009, I rebuilt the above firewall using Debian GNU/Linux
and decided to configure IPv6 using the
/etc/network/interfaces file.
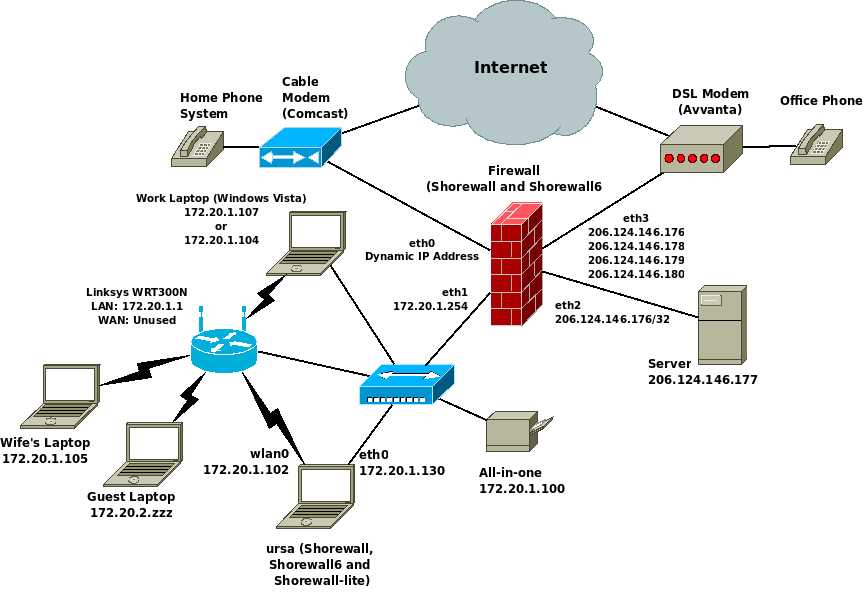
When I installed Debian Lenny on the system, the network interfaces were reunmbered as follows:
Table 1. Interface Renaming
| Old Configuration | New Configuration |
| eth0 (Avvanta Interface) | eth3 |
| eth3 (Comcast Interface) | eth0 |
| eth2 (Local Interface) | eth1 |
| eth4 (DMZ Interface) | eth2 |
So the IPv4 network was transformed to this:
To implement the same IPv6 network as described above, I used this /etc/shorewall/interfaces file:
auto lo
iface lo inet loopback
auto eth0
iface eth0 inet dhcp
hwaddress ether 00:11:85:89:da:9b
auto eth1
iface eth1 inet static
address 172.20.1.254
netmask 255.255.255.0
network 172.20.1.0
broadcast 172.20.1.255
iface eth1 inet6 static
address 2002:ce7c:92b4:1::1
netmask 64
auto eth2
iface eth2 inet static
address 206.124.146.176
netmask 255.255.255.255
up ip route add 206.124.146.177/32 dev eth2
iface eth2 inet6 static
address 2002:ce7c:92b4:2::1
netmask 64
auto eth3 eth3:0 eth3:1 eth3:2
iface eth3 inet static
address 206.124.146.176
netmask 255.255.255.0
network 206.124.146.0
broadcast 206.124.146.255
iface eth3:0 inet static
address 206.124.146.178
netmask 255.255.255.0
broadcast 206.124.146.255
iface eth3:1 inet static
address 206.124.146.179
netmask 255.255.255.0
broadcast 206.124.146.255
iface eth3:2 inet static
address 206.124.146.180
netmask 255.255.255.0
broadcast 206.124.146.255
auto sit1
iface sit1 inet6 v4tunnel
address 2002:ce7c:92b4::1
netmask 64
endpoint 192.88.99.1
local 206.124.146.180
gateway ::192.88.99.1
ttl 64
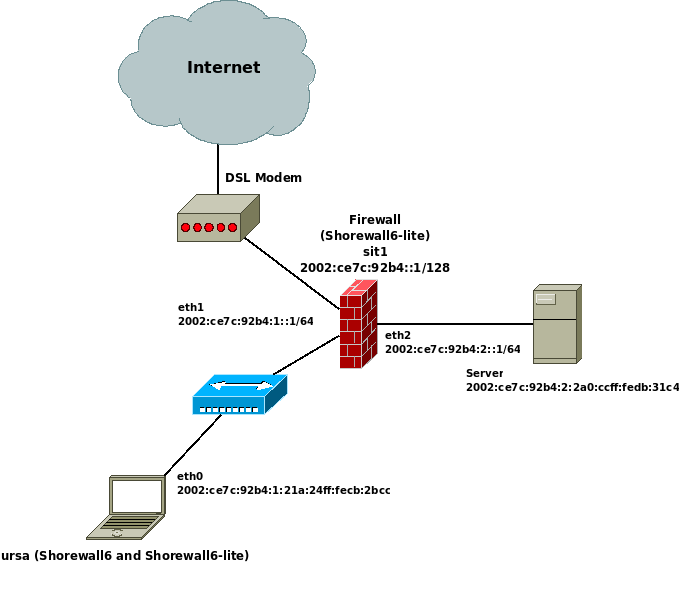
post-up echo 1 > /proc/sys/net/ipv6/conf/all/forwardingThat file produces the following IPv6 network.
We need to add an entry in /etc/shorewall/tunnels and restart Shorewall:
#TYPE           ZONE            GATEWAY                 GATEWAY_ZONE
6to4            net
STOP -- If you have followed the instructions above, you should have a completely functional IPv6 network. Try:
ping6 www.kame.net
ping6 ipv6.chat.eu.freenode.net
If neither of those work from your firewall and from any local IPv6 systems that you have behind your firewall, do not go any further until one of them does work. If you ask for help from the Shorewall team, the first question we will ask is 'With Shorewall6 cleared, can you ping6 kame or freenode?'.
The Shorewall6 configuration on my firewall is a very basic three-interface one.
Key entry in
/etc/shorewall6/shorewall6.conf:
IP_FORWARDING=On
/etc/shorewall6/zones:
#ZONE           TYPE            OPTIONS         IN_OPTIONS      OUT_OPTIONS

fw	        firewall
net	        ipv6
loc	        ipv6
dmz	        ipv6
/etc/shorewall6/interfaces:
?FORMAT 2
#ZONE           INTERFACE               OPTIONS

net             sit1                    tcpflags,forward=1,nosmurfs
loc             eth0                    tcpflags,forward=1
dmz             eth2                    tcpflags,forward=1
/etc/shorewall6/policy:
#SOURCE    DEST    POLICY    LOGLEVEL    LIMIT
net        all     DROP      info
loc        net     ACCEPT
dmz        net     ACCEPT
all        all     REJECT    info
/etc/shorewall6/rules:
#ACTION         SOURCE          DEST            PROTO   DPORT   SPORT   ORIGDEST        RATE            USER    MARK    CONNLIMIT       TIME    HEADERS SWITCH  HELPER

?SECTION ALL
?SECTION ESTABLISHED
?SECTION RELATED
?SECTION INVALID
?SECTION UNTRACKED
?SECTION NEW
#
#       Accept DNS connections from the firewall to the network
#
DNS(ACCEPT)      $FW             net
#
#       Accept SSH connections from the local network for administration
#
SSH(ACCEPT)      loc             $FW
#
#       Allow Ping everywhere
#
Ping(ACCEPT)     all             all
6in4 is very similar to 6to4:
Both Tunnel IPv6 traffic over IPv4 using Protocol 41
Both allow you access to the IPv6 network even though your ISP doesn't offer native IPv6 connectivity.
The differences are:
6in4 gives you a /64 prefix outside of the 2002::0/16 network
You have a dedicated fixed endpoint for the tunnel rather than the nebulous anycast endpoint 192.88.99.1. This is:
Much more reliable
Much easier to troubleshoot (there is ONE host and one company to call on the other end of the tunnel rather than an indefinite cloud with noone in charge)
I converted to a 6in4 Tunnel from Hurricane Electric in April of 2010. Converting from the 6to4 tunnel configuration above to a 6in4 tunnel from HE took less than an hour.
When I signed up for a tunnel with HE, I received these assignments:
Server IPv4 address: 216.218.226.238
Server IPv6 address: 2001:470:a:227::1/64
Client IPv4 address: 206.124.146.180 (Same as the 6to4 tunnel)
Client IPv6 address: 2001:470:a:227::2/64
I also took advantage of their offer for a /48 prefix routed via 2001:470:a:227::2. The prefix I was assigned is
2001:470:e857::/48
Here are the key changes:
/etc/network/interfaces:
iface eth1 inet6 static
        address 2001:470:e857:1::1
        netmask 64

auto eth2
...
iface eth2 inet6 static
      address 2001:470:e857:2::1
      netmask 64

auto sit1
iface sit1 inet6 v4tunnel
      address 2001:470:a:227::2
      netmask 64
      endpoint 216.218.226.238
      local 206.124.146.180
      gateway 2001:470:a:227::1
      ttl 64
      post-up echo 1 > /proc/sys/net/ipv6/conf/all/forwarding
/etc/radvd.conf (I'm currently not using RDNSS so I've
    simply commented out the existing entries)
:
interface eth1 {
        AdvSendAdvert on;
        MinRtrAdvInterval 60;
        MaxRtrAdvInterval 600;
        AdvDefaultLifetime 9000;
        prefix 2001:470:e857:1::/64 {
                AdvOnLink on;
                AdvAutonomous on;
                AdvRouterAddr off;
        };

        route ::/0 {
                AdvRouteLifetime infinity;
        };

#       RDNSS 2002:ce7c:92b4:2:221:5aff:fe22:ace0 {
#                AdvRDNSSOpen on;
#                AdvRDNSSPreference 2;
#        };
};

interface eth2 {
        AdvSendAdvert on;
        MinRtrAdvInterval 60;
        MaxRtrAdvInterval 600;
        prefix 2001:470:e857:2::/64 {
                AdvOnLink on;
                AdvAutonomous on;
                AdvRouterAddr off;
        };

#       RDNSS 2002:ce7c:92b4:2:221:5aff:fe22:ace0 {
#              AdvRDNSSOpen on;
#               AdvRDNSSPreference 2;
#        };
};
Suppose that we have the following situation:
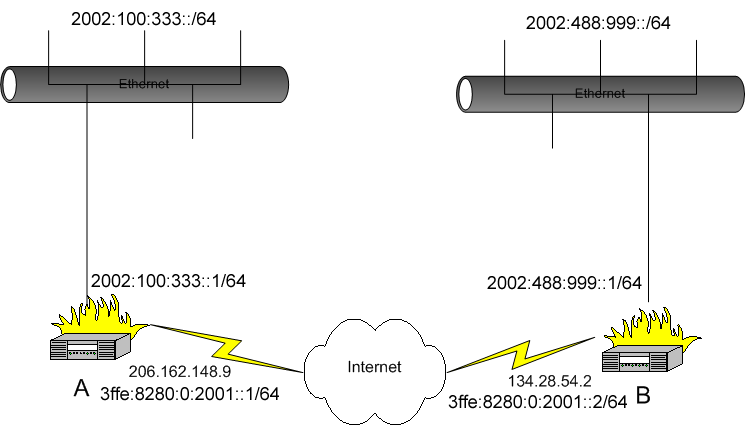
We want systems in the 2002:100:333::/64 subnetwork to be able to
communicate with the systems in the 2002:488:999::/64 network. This is
accomplished through use of the
/etc/shorewall/tunnels file and the “ip”
utility for network interface and routing configuration.
Unlike GRE and IPIP tunneling, the
/etc/shorewall/policy,
/etc/shorewall/interfaces and
/etc/shorewall/zones files are not used. There is no
need to declare a zone to represent the remote IPv6 network. This remote
network is not visible on IPv4 interfaces and to iptables. All that is
visible on the IPv4 level is an IPv4 stream which contains IPv6 traffic.
Separate IPv6 interfaces and ip6tables rules need to be defined to handle
this traffic.
In /etc/shorewall/tunnels on system A, we need
the following:
#TYPE           ZONE            GATEWAY                 GATEWAY_ZONE
6to4            net             134.28.54.2
This entry in /etc/shorewall/tunnels opens the
firewall so that the IPv6 encapsulation protocol (41) will be accepted
to/from the remote gateway.
Use the following commands to setup system A:
>ip tunnel add tun6to4 mode sit ttl 254 remote 134.28.54.2
>ip link set dev tun6to4 up
>ip addr add 3ffe:8280:0:2001::1/64 dev tun6to4
>ip route add 2002:488:999::/64 via 3ffe:8280:0:2001::2
Similarly, in /etc/shorewall/tunnels on system
B we have:
#TYPE           ZONE            GATEWAY                 GATEWAY_ZONE
6to4            net             206.191.148.9
And use the following commands to setup system B:
>ip tunnel add tun6to4 mode sit ttl 254 remote 206.191.148.9
>ip link set dev tun6to4 up
>ip addr add 3ffe:8280:0:2001::2/64 dev tun6to4
>ip route add 2002:100:333::/64 via 3ffe:8280:0:2001::1
On both systems, restart Shorewall and issue the configuration commands as listed above. The systems in both IPv6 subnetworks can now talk to each other using IPv6.